How to Organize a Small Pantry with Stackable Plastic Storage Bins and Labels
By OneIDDeal™ | Published: 2026-06-26
Category: How-to Guides
Discover smart small pantry organization ideas using stackable plastic bins with lids and labels. Transform cluttered shelves into a streamlined, accessible space.
If your small pantry looks more like a chaotic jumble of half-empty boxes, mismatched cans, and forgotten snacks than a tidy storage haven, you are not alone. The good news? You do not need a renovation or a huge budget to bring order to your shelves. With a handful of stackable plastic bins with lids, a label maker (or simple printable tags), and a few strategic steps, you can transform even the tiniest pantry into a model of efficiency. This guide walks you through every stage—from purging and sorting to choosing the right containers and maintaining your system long-term.
Why Stackable Plastic Bins Are a Game-Changer for Small Pantries
Traditional pantry organization often relies on shelving alone, which leaves vertical space wasted and items toppling over. Stackable plastic storage bins solve these problems by creating modular, self-contained units that maximize every inch. They are transparent (so you can see contents at a glance), durable, and easy to clean. Unlike bulky baskets or open wire racks, bins with lids keep dust, pests, and moisture out, which is especially important for dry goods like flour, pasta, and cereals.
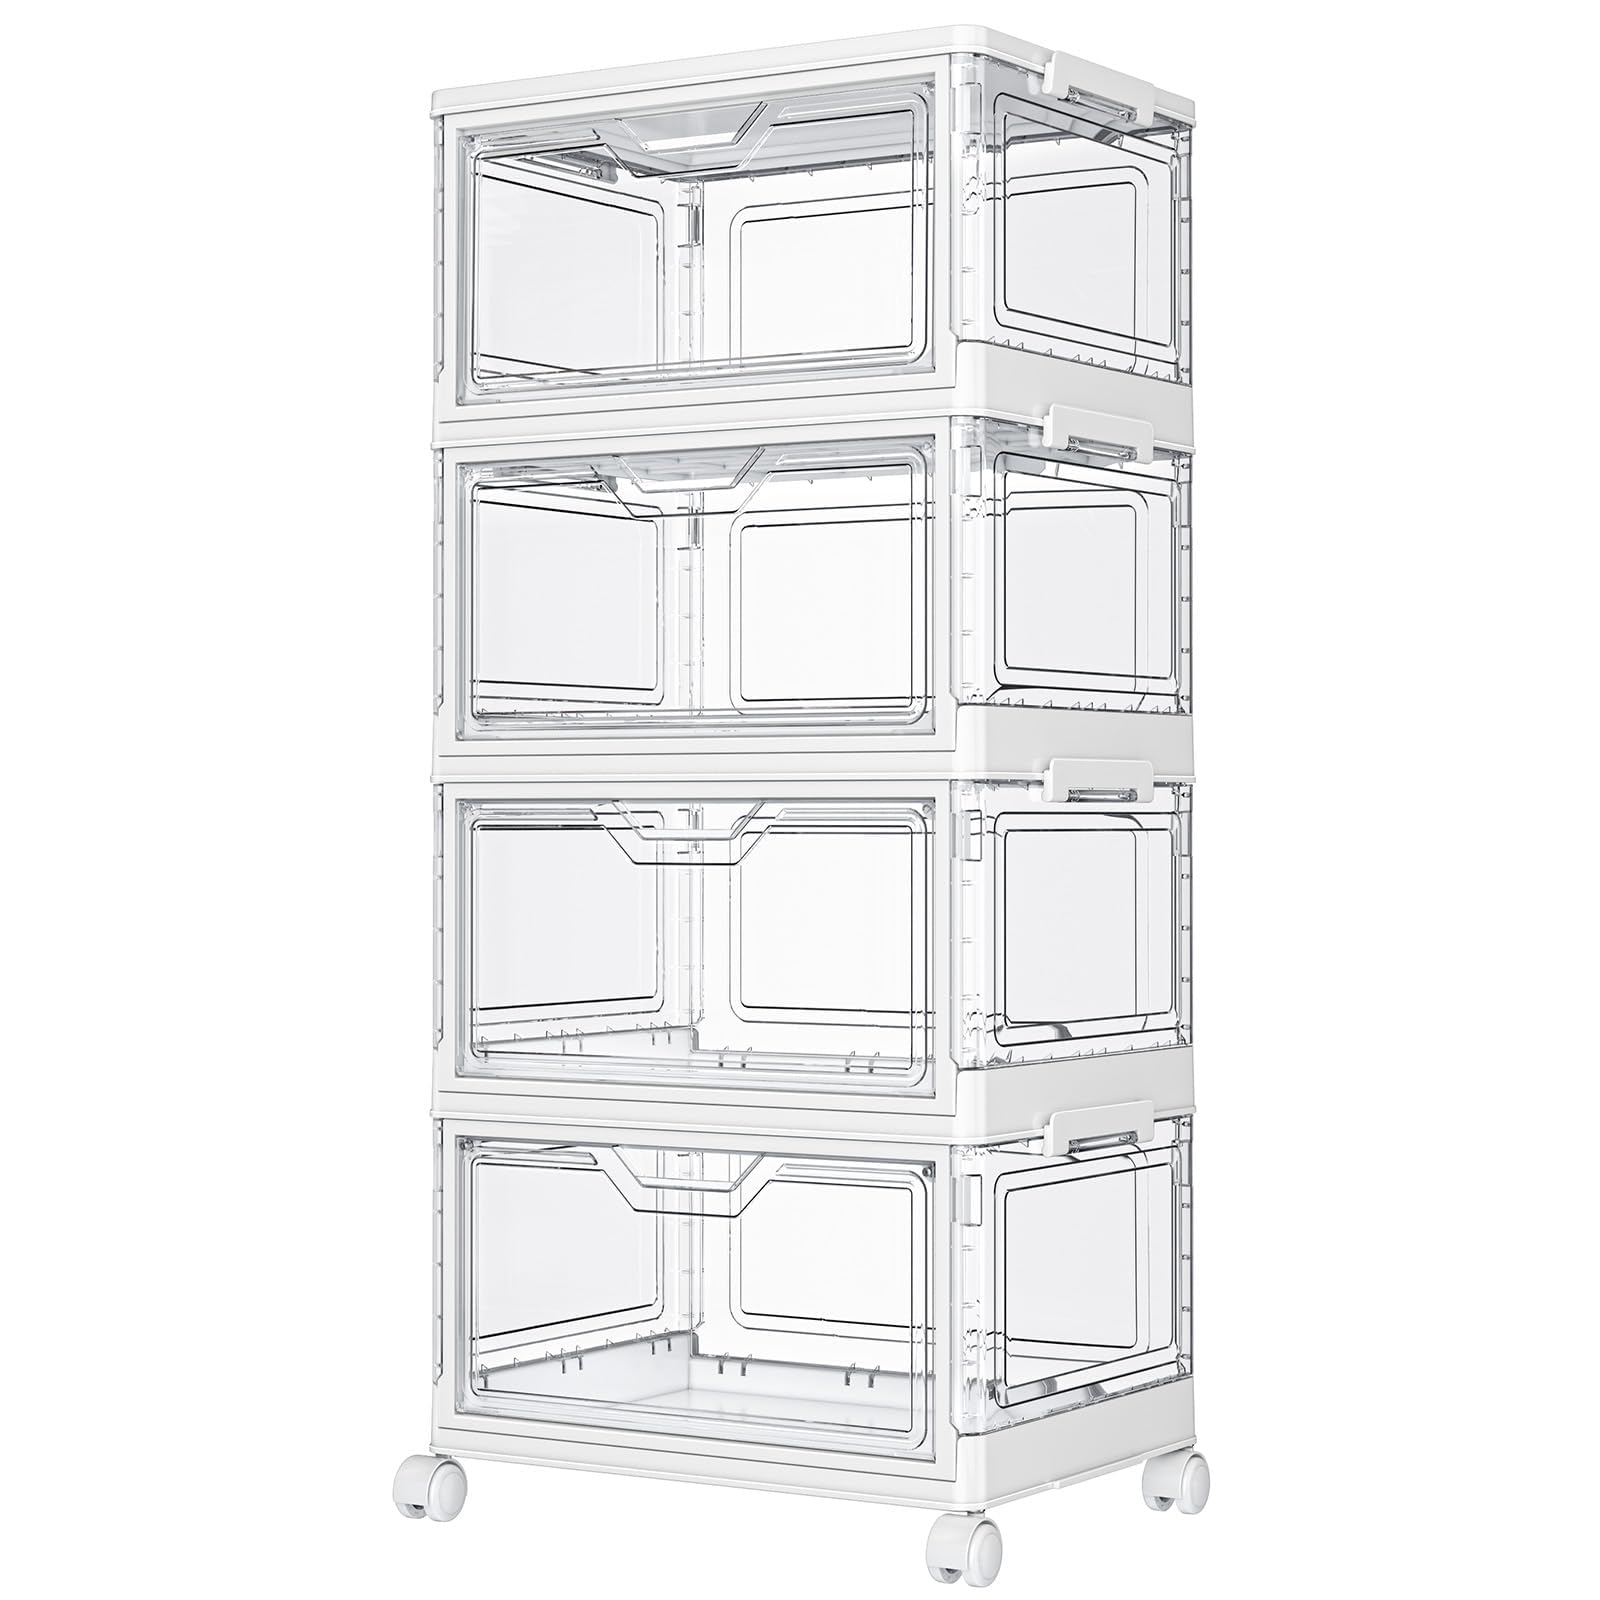
For a budget-friendly upgrade, consider the Kmiectse Clear Storage Bins with Lids - 4 Tier Plastic Bins with Wheels, Stackable Storage Bin, Closet Organizers Box for Bedroom, Living Room, 23 QT Foldi. These bins offer a clear view of your supplies, stack securely, and even include wheels for easy access—perfect for deep pantry shelves where items often get lost.

Step 1: Empty and Purge Your Pantry
Before you buy a single bin, you need a clean slate. Remove everything from your pantry shelves—every can, box, bag, and bottle. Lay items out on your kitchen counter or table. This step is crucial because it forces you to assess what you actually have versus what you thought you had.
Sort into Keep, Toss, and Donate Piles
Check expiration dates. Any food past its prime goes into the trash or compost. Items that are still good but you will never use (think that odd spice blend from a holiday gift) can go to a food bank. For non-food pantry items like cleaning supplies, discard anything broken or dried out.
Wipe Down Shelves
With the pantry empty, take a damp cloth and wipe down every shelf, corner, and crevice. This is also a good time to vacuum or sweep the floor. A clean starting point makes your organization system feel fresh and intentional.
Step 2: Measure Your Pantry and Shelves
One of the biggest mistakes in pantry organization is buying bins that do not fit. Use a tape measure to record the depth, width, and height of each shelf. Write these numbers down. Also note the distance between shelves—this determines how tall your stacked bins can be.
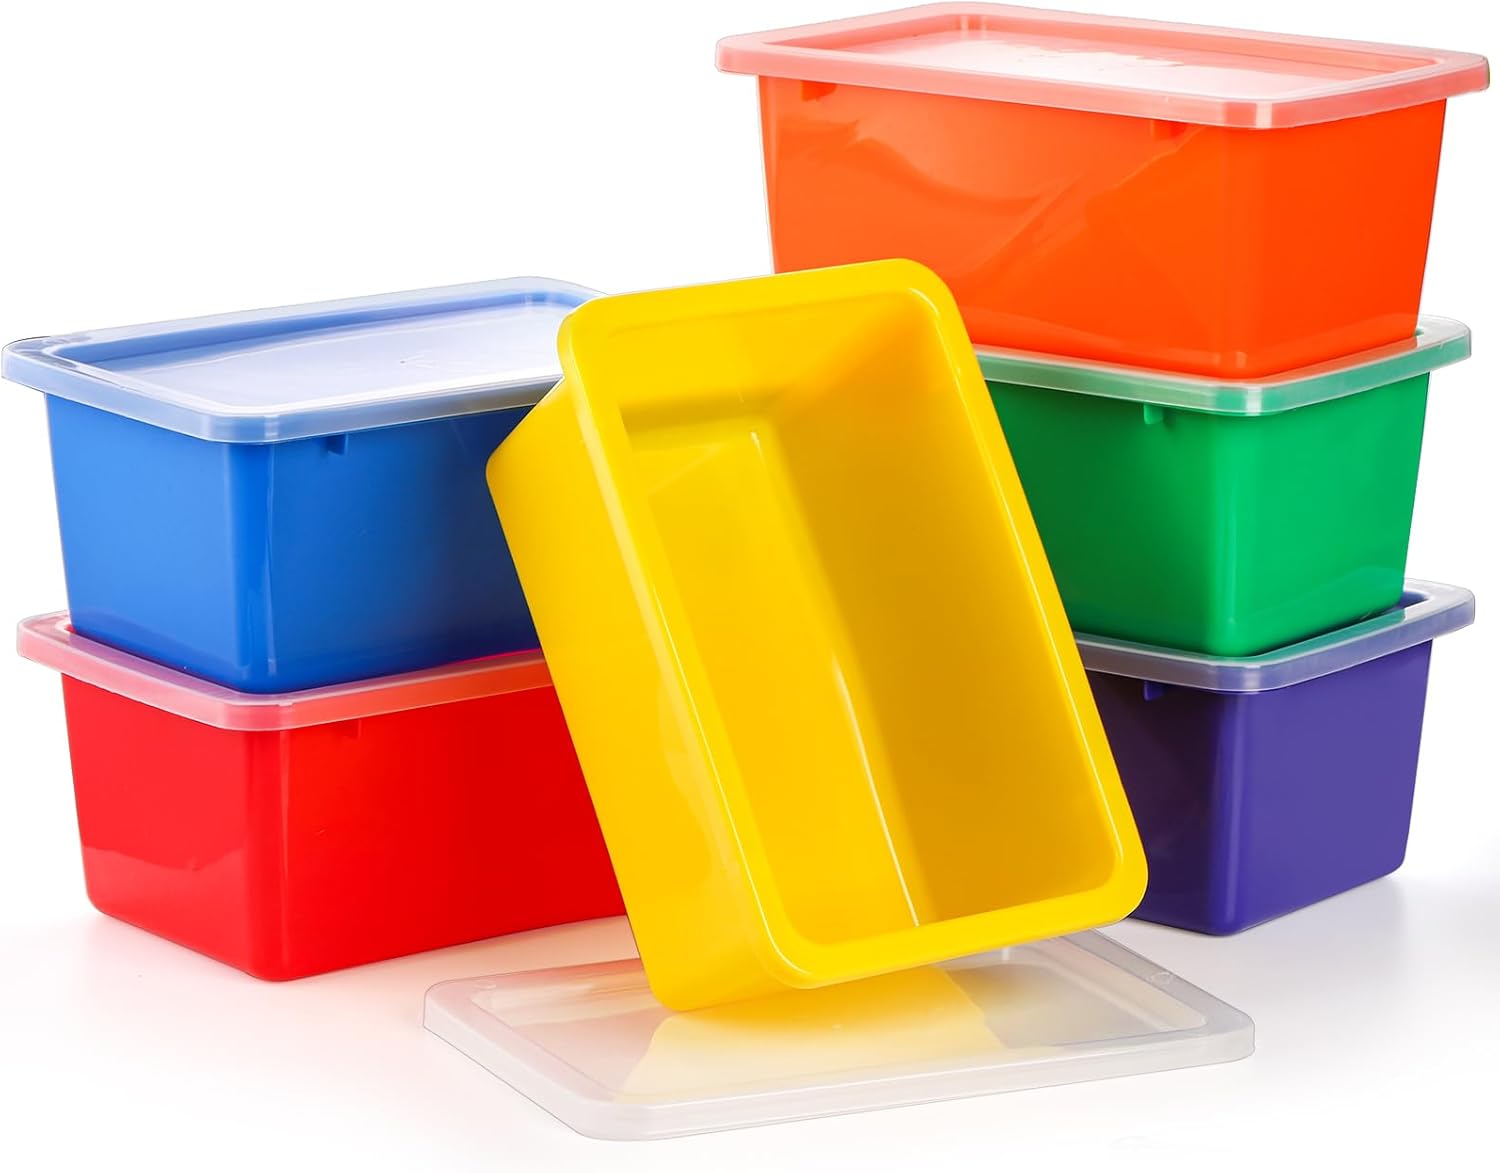
When selecting bins, aim for a snug fit. You want bins that slide in easily but leave minimal wasted space on the sides. For narrow shelves, consider the Nicunom 6 Pack Small Cubby Bins Storage Bins with Lids, 5 Qt Plastic Storage Bins Colorful Toy Storage Containers, Stackable Organizer Cubbies for Classroom Home. These smaller bins are ideal for spices, snack packs, or baby food jars, and they stack neatly to create a compact tower.
Step 3: Categorize Your Pantry Items
Group your keep pile into logical categories. Common pantry categories include:
- Baking supplies: flour, sugar, baking soda, chocolate chips
- Grains and pasta: rice, quinoa, spaghetti, couscous
- Canned goods: beans, tomatoes, coconut milk
- Snacks: chips, granola bars, nuts, dried fruit
- Condiments and oils: vinegar, soy sauce, olive oil, ketchup
- Breakfast items: cereal, oatmeal, pancake mix
- Pet supplies: treats, kibble refills (if you store them in the pantry)
This categorization will guide which bin size and quantity you need for each group. For example, canned goods can go into a deeper bin, while snack pouches fit better in a shallow, wide bin.
Step 4: Choose the Right Stackable Bins
Now armed with your measurements and categories, it is time to select your bins. Look for these features:
- Clear material: So you can see contents without opening.
- Sturdy lids: That snap on securely to allow stacking.
- Uniform shape: Rectangular bins use space more efficiently than round ones.
- Easy-grip edges: For pulling bins off shelves without spilling.
If you need a combination of sizes, the Kmiectse Clear Storage Bins with Lids (mentioned above) come in a 4-tier set that can be used individually or stacked as a unit. This gives you flexibility to adapt as your pantry changes.
Step 5: Label Everything
Labels are the secret sauce that turns a good organization system into a great one. They ensure every family member knows where items belong—and where to return them. Use a label maker for a crisp, uniform look, or print simple labels on sticker paper. For a rustic touch, chalkboard labels or washi tape with handwritten tags work well.
Labeling Tips
- Label the front of each bin, not the top (so you can read it when bins are stacked).
- Include both the category name and, for multi-bin stacks, a number (e.g., “Snacks – Bin 1 of 3”).
- Consider using color-coded labels or bins for different zones (e.g., red for baking, blue for snacks).
For a minimalist approach, skip the labels on the bins themselves and instead label the shelf edges. This works well if you frequently rotate bin contents.
Step 6: Arrange Bins on Shelves (The “Zone” Method)
Now comes the satisfying part: placing your filled bins onto the pantry shelves. Use a zone-based layout:
- Top shelf (hard to reach): Lightweight, rarely used items like specialty flours, holiday baking supplies, or backup condiments. Use stackable bins here to maximize height.
- Middle shelf (eye level): Everyday items you grab daily: cereal, coffee, snacks, pasta. Place these in single-layer bins or shallow stacks for quick access.
- Bottom shelf (or floor): Heavy items like canned goods, large oil bottles, or pet food. Use sturdy bins with handles or wheels, like the Kmiectse set.
Within each zone, group similar categories together. For example, all baking bins on the top shelf, all snack bins on the middle shelf. This logic makes restocking and meal planning faster.
Step 7: Maintain Your System (Without the Stress)
The hardest part of any organization project is keeping it that way. Here are three maintenance habits to adopt:
- One-in, one-out rule: Whenever you buy a new pantry item, remove an old one (or donate it). This prevents creep.
- Monthly quick tidy: Set a 10-minute timer each month to wipe down bins, check for expired items, and re-stack anything that has shifted.
- Use the “first-in, first-out” principle: When restocking a bin, place newer items at the back and older ones at the front. This cuts down on waste.
If you find that certain bins are always overflowing while others sit empty, it is a sign you need to adjust your categories or bin sizes. Do not be afraid to swap bins around—flexibility is the key to a system that works for your real-life habits.
Beyond the Pantry: Apply This System to Other Areas
The same principles of small pantry organization with stackable plastic bins work beautifully for other storage challenges around the home. Use bins in your bathroom for toiletries, in your linen closet for towels, or in your garage for tools and supplies. The Nicunom 6 Pack Small Cubby Bins Storage Bins with Lids, for example, are perfect for corralling kids’ art supplies or office desk accessories. Their stackable design and bright colors make organization feel playful rather than punitive.
Common Mistakes to Avoid
Even with the best intentions, pantry organization can go wrong. Here are pitfalls to steer clear of:
- Buying bins without measuring first: You will end up with bins that are too tall, too wide, or too deep for your shelves.
- Over-labeling: If you label every single bin with extremely specific contents (e.g., “black beans, 15 oz, 3 cans”), you will drive yourself crazy when you restock. Stick to category labels.
- Ignoring the “lazy zone”: If a bin is hard to pull out or the lid is a struggle to open, you will stop using it. Opt for bins with easy-open lids or handles.
- Filling bins to the brim: Leave a little headroom so you can easily grab items without tipping the bin over.
Final Thoughts: A Pantry You Will Actually Enjoy Opening
A well-organized pantry is more than just visually pleasing—it saves you money (no more buying duplicates), reduces food waste, and cuts meal prep time in half. By investing in a set of quality stackable plastic bins with lids and taking the time to label and zone your shelves, you create a system that works with your lifestyle, not against it.
Start small: pick one shelf, empty it, measure it, and order a few bins. Once you see how satisfying a tidy shelf can be, you will be motivated to tackle the entire pantry. And remember, the goal is not perfection—it is a pantry that helps you cook with ease and enjoy your space.
Ready to get started? Explore the Kmiectse Clear Storage Bins with Lids to give your pantry the organized upgrade it deserves.